
In our recent blog (Social Media: What Is It All About?), we discussed the various functions and...
Picture This: How to Get Started with Instagram
In related blogs, we explained the differences in social media websites and reviewed the process of setting up accounts on Facebook, Twitter, Pinterest, and TikTok. In this blog, you will learn how to create an account and set up an Instagram profile. Although Instagram is owned by Facebook, there are slight differences in the sign-up process between them. One of the main differences between the two is that you can sign up with Instagram using your existing Facebook account. This can make it faster and easier to create a new account on Instagram than on Facebook.
Step 1- Create an Account: Log in with Facebook
Go to www.instagram.com and click "Sign Up". Next, you will be prompted with this screen:

Unlike Facebook, there are two options for signing up for Instagram. The first option is to log in with your Facebook account and the second option is to create a new account. If you choose to log in with Facebook, click on the blue button that says, "Log in with Facebook". Type in the phone number or email address and password associated with your Facebook account and click on the blue button that says, "Log In". Your screen will look like this: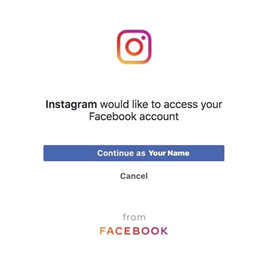 Click "Continue as Name". You will be prompted to create a username and password. When creating a username, Instagram will only allow you to make a username that nobody else has. If you type a username already taken, a red X will show up, and if you type a unique username, a gray check-mark will show up. Once you have created a valid username and password, click "Sign Up".
Step 2- Create a New Account
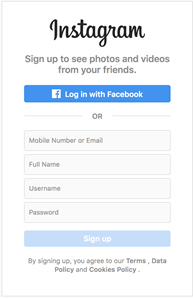
If you choose to sign up without Facebook, enter your email address, phone number, username, and password into the boxes on this page:
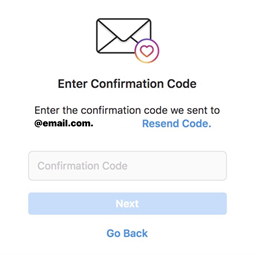
Click the blue "Sign Up" button to continue. Enter your birthday and click "Next". Your birthday will not be shown on your account. Even so, as with Facebook, you may want to enter a false birthday to protect your privacy. You will be asked to confirm your email address. To do so, go to the associated email account and find the email from Instagram. Within this email is a confirmation code that you will enter into the box that says, "Confirmation Code" on this page:
Click "Next".
Step 3- Add Phone Number
Your page will now look like this:
Click on the account icon in the top left corner that looks like a silhouette. Then click "Profile". On your profile page, you will see this screen:

Click the blue button that says, "Add Phone Number". A confirmation code will be texted to you. Enter this code into the box that says, "Confirmation Code" and then click "Done".
Step 4- Add a Profile Photo
From this point on, the steps will be the same whether you chose to sign up using Facebook or not. Your page will look like this:
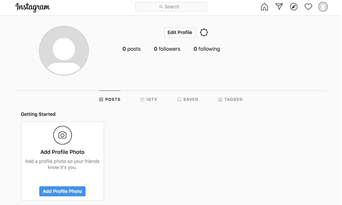
Click the blue button that says, "Add Profile Photo", and you will be redirected to the files on your computer. On the left-hand column, scroll to the bottom and click "Photos". Your photos will appear, and you can choose one for your profile picture by clicking on the image. There should be a blue frame around your chosen photo. Click the blue button in the bottom right-hand corner that says "Open", and your profile photo will appear on your profile.
Step 5- Complete Your Profile
Click the button next to your profile photo and username that says, "Edit Profile". Your screen will look like this:
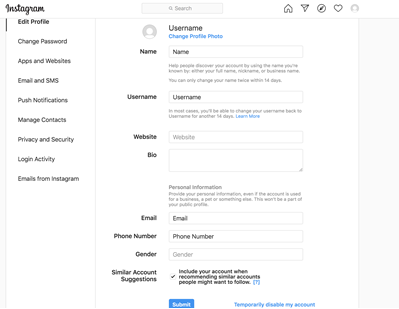
You will already have your profile photo, name, username, email, and phone number added to your account. To complete your profile, you can choose to add a website, bio, and your gender. You can add a link to any website, such as a link to your business website, blog website, or anything else you want your followers to see and have access to. All you have to do is copy and paste the link to any website into the box that says, "Website". To add a bio (biography), click on the box next to "Bio" and type something about yourself, add a quote you like, etc. Lastly, you can choose to add your gender by clicking on the box that says, "Gender", and your screen will look like this:

You can click on any of the above options to select your gender. Once you have completed these steps, click the blue button at the bottom of the page that says, "Submit". A message will appear at the bottom of your screen that says, "Profile Saved". To return to your profile, click on your profile photo at the top right-hand corner of the page and click "Profile".
Step 6- Privacy Settings
To edit your privacy settings, click on your profile photo in the top right-hand corner of the page and click "Settings." On the left-hand side of the page, click "Privacy and Security". Your page will look like this:
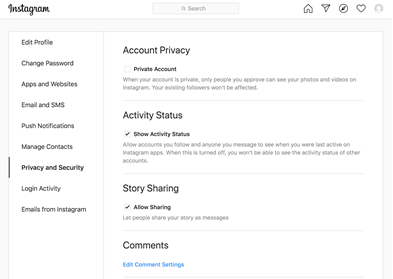
If you want your account to be private, click the box next to "Private Account". The two options below, "Show Activity Status" and "Allow Sharing", will only be allowed to your followers if you choose to make your account private. If you keep your account public, you can choose to turn either of these options off by clicking the box next to them.
Step 7- Download the Instagram App
One key difference between Facebook and Instagram is that you cannot post on Instagram on a computer like you can on Facebook. However, you can still view your account and feed on a computer. To post on Instagram, you will need to download the app on your phone. To do so, go to the app store and search "Instagram" in the search bar.

Click the button that says, "Get" and then enter your Apple ID password to download the app. Once you download the app, enter your username and password and click the blue button that says, "Log In".
Once you have followed these steps, your profile is now complete, and you are ready to start making Instagram friends and posting on your account. Like Facebook, be careful about what you post on Instagram, such as an upcoming vacation and personal information.
Although Facebook is also a popular photo-sharing website and the most popular social media network worldwide, Instagram is a better platform to interact with younger generations. It is more popular among younger people than Facebook due to the extended social interactions beyond close friends and family members.
Once you join, consider following Cantissimo Senior Living to keep up with new posts and updates!

Related Content: